✓ Mastering realistic portraits requires understanding anatomy and proportion.
✓ Value and shading are crucial for creating depth and form.
✓ Practice observation skills to capture individual likeness.
✓ Patience and continuous learning are key to improvement.
How It Works
1
Understand Basic Anatomy
Begin by studying the underlying bone structure and muscle groups of the human face. This foundational knowledge is essential for accurate placement and form.
2
Master Proportions and Placement
Learn the classical rules of facial proportions, but also how to adapt them to individual subjects. Accurate placement of features is critical for likeness.
3
Develop Value and Shading Skills
Practice creating a full range of values from light to dark to give your portraits three-dimensionality. Understanding how light falls on form is paramount.
4
Refine Details and Textures
Focus on rendering subtle details like skin texture, hair, and eyes to bring your portrait to life. Patience and careful observation are vital in this stage.
The Foundations of Realistic Portrait Drawing: Anatomy and Proportion
Photo: Tima Miroshnichenko / Pexels
Embarking on the journey of how to draw realistic portraits begins with a deep understanding of the human face's fundamental structure. Without this groundwork, even the most meticulous shading will fall flat. Think of the skull as the architectural blueprint of the head; it dictates the overall shape, the placement of the eyes, nose, and mouth, and even subtle variations in an individual's appearance. Start by familiarizing yourself with basic anatomical landmarks: the brow bone, cheekbones (zygomatic arch), jawline (mandible), and the structure of the nose and eye sockets. Understanding how these bones sit beneath the skin is paramount. Many beginners skip this crucial step, leading to portraits that lack convincing form and depth. A great exercise is to draw skulls from various angles, focusing on their three-dimensional quality and how light interacts with their surfaces. This isn't about memorizing every muscle, but rather grasping the larger forms and how they influence the surface.
Once you have a grasp of the skeletal structure, move on to the muscles that overlay it. While you don't need to be a medical expert, knowing the general location and function of key facial muscles – like the orbicularis oculi around the eyes or the orbicularis oris around the mouth – will inform how you draw expressions and subtle contours. These muscles aren't just for movement; they create the soft tissue forms that define a face. For instance, the way the cheek muscles connect to the jaw can create a soft curve or a sharp angle, depending on the individual.
Proportion is the next pillar. While every face is unique, there are widely accepted guidelines that serve as an excellent starting point. The 'rules' of thirds – dividing the face into three horizontal sections from hairline to brow, brow to nose base, and nose base to chin – are fundamental. Similarly, the eyes are typically halfway down the head, and the space between the eyes is often equivalent to the width of one eye. These are not rigid laws but flexible benchmarks. Your goal isn't to make every face conform to these rules, but to understand them so you can accurately observe and depict deviations. Practice measuring your subject's features against these guidelines, noting where they differ. Use tools like a plumb line (a vertical straight edge) or a level (a horizontal straight edge) to check alignment of features. For example, are the corners of the eyes level with each other? Is the base of the nose centered? These simple checks can dramatically improve the accuracy of your initial sketch. Remember, the goal is not just to draw what you see, but to understand *why* it looks that way. This combination of anatomical knowledge and proportional understanding forms the bedrock for creating truly realistic and compelling portraits.
Mastering Value and Form: Bringing Your Portraits to Life
Photo: Alexander Krivitskiy / Pexels
Once the foundational structure and proportions are in place, the next critical step in how to draw realistic portraits is to master value and form. Value refers to the lightness or darkness of a color or tone, and it's arguably the single most important element for creating the illusion of three-dimensionality on a two-dimensional surface. Without a full range of values, your portrait will appear flat and lifeless, regardless of how accurate your initial sketch was. Begin by understanding the concept of a value scale, ranging from pure white (the highlight) to pure black (the deepest shadow). Your goal is to identify and represent these different tones across your subject's face.
Light is what reveals form. As light hits a curved surface like a cheekbone or the forehead, it creates a gradient of values. The area directly facing the light source will be the lightest (the highlight), transitioning through various mid-tones as the surface curves away, eventually reaching the core shadow where the light no longer directly illuminates the form. Beyond the core shadow, you'll often find reflected light – light bouncing off surrounding surfaces and subtly illuminating the shadow areas. This reflected light is crucial for giving shadows depth and preventing them from looking like flat, black holes. Pay close attention to the terminator line, the boundary where light transitions into shadow. This line is rarely sharp; it often softens or becomes more defined depending on the sharpness of the underlying form.
To effectively render value, practice using a variety of pencil grades. H-grade pencils are harder and produce lighter lines, ideal for initial sketches and light tones. B-grade pencils are softer and produce darker lines, essential for mid-tones and deep shadows. Experiment with different pressures and layering techniques to build up your values gradually. Avoid pressing too hard too soon, as this can make it difficult to erase or blend. Instead, use multiple light layers, slowly building up the intensity. Blending tools like tortillons, stumps, or even cotton swabs can help create smooth transitions, but use them judiciously. Over-blending can erase the subtle textures and forms you've worked hard to establish.
Furthermore, consider the light source itself. Is it soft and diffused, like natural light from a window, creating subtle transitions? Or is it harsh and direct, like a spotlight, resulting in strong contrasts and sharp shadows? The quality and direction of light will profoundly impact the value scheme of your portrait. Observe how different light sources affect your subject's features, creating unique highlights and shadow patterns. This observation is key to capturing not just *a* face, but *that specific* face under *those specific* lighting conditions. By meticulously applying a full range of values and understanding how light sculpts form, you will transform your flat outlines into volumetric, realistic portraits.
Capturing Likeness and Expression: The Soul of the Portrait
Photo: Eduarda Freitas / Pexels
Beyond accurate anatomy, proportion, and value, truly mastering how to draw realistic portraits lies in capturing the unique likeness and expression of your subject. This is where the technical skills merge with artistic observation and empathy. A portrait isn't just a depiction of features; it's a representation of an individual's character and fleeting emotions. Start by training your eye to see the subtle nuances that make one face distinct from another. While proportional guidelines are helpful, every face deviates in unique ways. One person might have eyes slightly closer together, another a longer philtrum, or a more pronounced brow bone. These small differences are what give a face its individuality. Resist the urge to generalize; instead, focus on observing and accurately rendering these specific characteristics.
Observe the relationships between features. For example, how does the angle of the jaw relate to the angle of the cheekbones? Is the distance from the nose to the upper lip shorter or longer than average? These relational measurements are often more important than isolated measurements. Use comparative measuring techniques, such as holding your pencil up to your subject to gauge relative sizes and angles. Look for negative space – the shapes formed between features – as these can often be easier to perceive accurately than the features themselves. For instance, the shape of the space between the nose and the upper lip, or between the corner of the eye and the hairline, can reveal inaccuracies in your drawing.
Expression is another vital component. A neutral expression can sometimes feel stiff; a subtle smile, a thoughtful gaze, or a slight furrow of the brow can infuse your portrait with life. Study how facial muscles move to create these expressions. The corners of the mouth turning up or down, the raising of eyebrows, the crinkling around the eyes – each contributes to the overall emotional tone. Practice drawing various expressions from photographs and live models. Don't just draw the final expression; try to understand the underlying muscular changes. This will make your expressions feel organic and believable, rather than pasted on.
Finally, pay close attention to the eyes. Often called the 'windows to the soul,' the eyes are paramount in capturing likeness and conveying emotion. The shape of the eyelids, the size and placement of the iris and pupil, the subtle reflections (catchlights), and the surrounding skin folds all contribute to the eye's character. A perfectly placed catchlight can make an eye sparkle with life, while its absence can make it appear dull. The direction of the gaze, the intensity of the stare, and even the slight asymmetry that often exists between two eyes are all details that contribute to a compelling, realistic portrait that resonates with the viewer. By meticulously observing and rendering these subtle details, you move beyond mere representation to truly capture the essence of your subject.
Refining Details and Avoiding Common Pitfalls
Photo: Nick Collins / Pexels
The final stages of how to draw realistic portraits involve meticulous refinement and a keen eye for detail, while also being aware of common mistakes that can hinder your progress. After establishing the major forms and values, it's time to add the textures that make a face truly believable. This includes rendering hair, skin, and clothing. For hair, avoid drawing individual strands initially. Instead, focus on blocking in large masses and observing how light and shadow play across these masses, creating clumps and flows. Gradually, you can add finer lines to suggest individual hairs, but always within the context of the larger forms. Remember, hair has volume and direction; it's not a flat, uniform texture.
Skin texture is another area where artists often struggle. The key is subtlety. Skin is rarely perfectly smooth; it has pores, fine lines, and subtle variations in tone. However, over-rendering these details can make the skin look rough or aged. Instead, suggest texture through nuanced value shifts and very light stippling or cross-hatching, allowing the underlying form to remain dominant. Pay attention to the subtle color variations in skin, even in monochromatic drawings, which can be suggested by warmer or cooler grays.
**Common Pitfalls to Avoid:**
* **Symmetry Trap:** While faces are generally symmetrical, perfect symmetry looks unnatural. Embrace slight asymmetries in eyes, eyebrows, or the mouth; these are what make a face unique and alive.
* **Outlining Everything:** Avoid harsh outlines around features. Instead, let forms emerge from the interplay of light and shadow. Where a feature meets another, the edge should be defined by a change in value, not a hard line.
* **Flat Hair:** As mentioned, treat hair as a three-dimensional form, not a flat wig. Observe how light hits it and how it falls.
* **'Fishing Eye' Syndrome:** This occurs when the eyes appear to be staring blankly or looking in different directions. Ensure the pupils and irises are perfectly aligned and focused, and that catchlights are consistent.
* **Ignoring Background:** Even a simple background can enhance or detract from your portrait. A subtle, blurred background can help frame the subject and add depth without distracting.
* **Rushing the Foundation:** Skipping steps like accurate proportioning or value blocking will always lead to problems later on. Patience in the initial stages saves significant rework.
* **Over-blending:** While blending can create smooth transitions, excessive blending can erase form and make your drawing look airbrushed and artificial. Use it selectively.
By meticulously refining these details and consciously avoiding these common errors, your realistic portraits will move from being merely 'good' to truly exceptional, capturing not just a likeness, but the very essence of your subject.
Comparison
Feature
Best Option (Graphite)
Alternative 1 (Charcoal)
Alternative 2 (Colored Pencil)
Control of Detail
Excellent
Good
Excellent
Value Range
Excellent
Superior
Good
Blending Ease
Good
Excellent
Fair
Cleanliness
Good
Poor
Good
Color Application
✗
✗
✓
Portability
✓
✓
✓
What Readers Say
★★★★★
"This guide completely changed my approach to portraits. I used to struggle with eyes, but the focus on anatomy and light has made them sparkle with life. My friends are amazed at the realism!"
Sarah J. · Austin, TX
★★★★★
"I've been drawing for years, but this article on how to draw realistic portraits offered insights I hadn't considered. The section on capturing subtle expressions was a game-changer for my work."
Mark T. · Seattle, WA
★★★★★
"Following these steps, I finally drew a portrait of my grandmother that truly looks like her. The emphasis on value and form made all the difference, creating depth I never achieved before."
Emily R. · Miami, FL
★★★★★
"Very comprehensive, though some sections could use more visual examples. Still, the advice on avoiding common pitfalls was incredibly helpful and improved my rendering of hair significantly."
David L. · Chicago, IL
★★★★★
"As a digital artist looking to improve my traditional drawing skills, this article was a fantastic resource. The principles of light and shadow apply universally and have elevated my digital portraits too."
Jessica M. · Denver, CO
Frequently Asked Questions
What's the most crucial element for drawing realistic portraits?
While many elements are important, understanding and accurately rendering value (light and shadow) is arguably the most crucial. It creates the illusion of three-dimensionality and form, making your flat drawing appear lifelike and volumetric. Without a full range of values, even perfect proportions will result in a flat image.
I struggle with making my portraits look like the person. How can I improve likeness?
Improving likeness comes down to meticulous observation and accurate measurement. Train your eye to see subtle deviations from average proportions and focus on the unique relationships between features. Use comparative measuring techniques, check angles, and pay close attention to negative space. Practice drawing from life or high-quality photos, constantly comparing your drawing to the reference.
How do I make hair look realistic instead of like a helmet?
To draw realistic hair, avoid drawing individual strands initially. Instead, focus on seeing hair as large masses and shapes that respond to light and shadow. Block in these major value areas first, then gradually add texture and individual strands within those established forms. Observe the direction of growth, how light catches the hair, and how it clumps together.
What drawing materials are best for realistic portraits?
For beginners, graphite pencils (a range from H to B grades) on smooth to medium-tooth drawing paper are excellent. Charcoal offers richer darks and easier blending but can be messier. For color, colored pencils or pastels can be used, but require a deeper understanding of color theory in addition to form and value. Start with what you're comfortable with and gradually experiment.
Is it better to draw from photos or live models?
Both have benefits. Drawing from live models teaches you to observe three-dimensional forms, light, and subtle movements, enhancing your observational skills. Photos offer convenience, allow you to study details without a time limit, and can capture specific expressions. Ideally, practice with both to develop a well-rounded skill set for how to draw realistic portraits.
Who should learn how to draw realistic portraits?
Anyone with a passion for art and a desire to capture the human form can learn. Whether you're a complete beginner eager to start your artistic journey, an experienced artist looking to refine your skills, or someone who simply enjoys the challenge of depicting life, learning realistic portraiture offers immense satisfaction and a profound understanding of human anatomy and expression.
Can I achieve realism if I'm not naturally talented?
Absolutely. While some individuals may have a natural aptitude, realistic drawing is primarily a learned skill that develops through consistent practice, patience, and understanding fundamental principles. Talent accounts for only a small part; dedication, observation, and applying the right techniques are far more important for achieving realism in your portraits.
What's the future trend in realistic portrait drawing?
While traditional techniques remain timeless, the future of realistic portrait drawing is increasingly influenced by digital tools and hybrid approaches. Artists are integrating digital sketching, reference manipulation, and even 3D modeling into their processes, allowing for greater precision and exploration of ideas before committing to a physical medium. However, the core principles of anatomy, light, and form will always be fundamental.
Ready to transform your artistic skills and create stunningly lifelike human faces? Embrace the journey of how to draw realistic portraits by applying these comprehensive techniques, and watch your artwork evolve into captivating reflections of the human spirit.

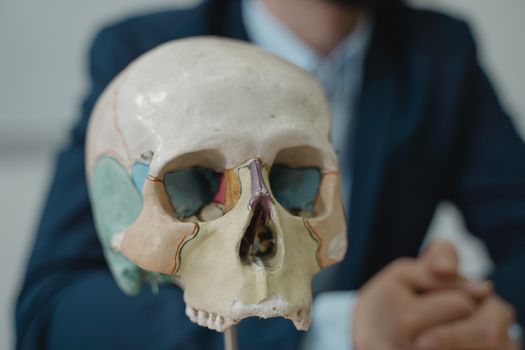 Photo: Tima Miroshnichenko / Pexels
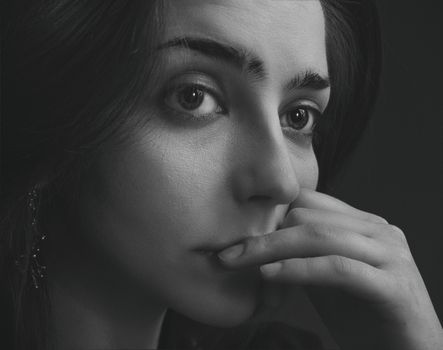 Photo: Alexander Krivitskiy / Pexels
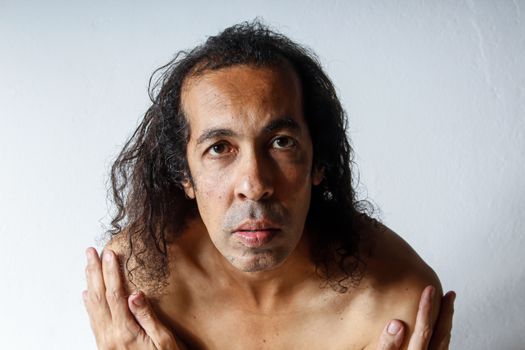 Photo: Eduarda Freitas / Pexels
 Photo: Nick Collins / Pexels